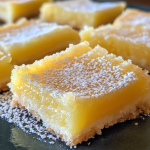
If you love the zesty taste of key lime pie but want a simpler, handheld version, Key Lime Pie Bars are the perfect treat! These bars combine a buttery graham cracker crust with a creamy, tangy key lime filling, offering a delightful balance of flavors in every bite. Whether you’re making them for a summer gathering or just craving something citrusy, this recipe will quickly become a favorite.
Why You’ll Love These Key Lime Pie Bars
✔️ Easy to Make: Simple ingredients and minimal prep time.
✔️ Perfectly Balanced Flavors: The rich crust complements the tangy lime filling.
✔️ Great for Any Occasion: Ideal for parties, picnics, or an everyday treat.
Ingredients
For the Crust:
- 1 ½ cups graham cracker crumbs
- ¼ cup granulated sugar
- 6 tbsp unsalted butter, melted
For the Filling:
- 1 can (14 oz) sweetened condensed milk
- 4 large egg yolks
- ½ cup fresh key lime juice (or bottled key lime juice)
- 1 tbsp key lime zest
For Garnish:
- Whipped cream
- Extra lime zest
- Lime slices
Instructions
Step 1: Prepare the Crust
- Preheat your oven to 350°F (175°C).
- In a mixing bowl, combine graham cracker crumbs, sugar, and melted butter. Mix until the crumbs are well coated.
- Press the mixture into an 8×8-inch baking dish lined with parchment paper.
- Bake for 8-10 minutes, then set aside to cool slightly.
Step 2: Make the Key Lime Filling
- In a medium bowl, whisk the egg yolks until smooth.
- Add the sweetened condensed milk and mix until fully combined.
- Stir in the key lime juice and lime zest, mixing until smooth.
- Pour the filling over the cooled crust and spread evenly.
Step 3: Bake and Chill
- Bake at 350°F (175°C) for 15 minutes, or until the center is set but slightly jiggly.
- Remove from the oven and let cool at room temperature for 30 minutes.
- Transfer to the refrigerator and chill for at least 2 hours, or overnight for best results.
Step 4: Slice and Serve
- Once fully chilled, lift the bars out using the parchment paper and place them on a cutting board.
- Slice into squares and top with whipped cream, extra zest, and lime slices.
- Serve and enjoy!
Tips for the Best Key Lime Pie Bars
- Use Fresh Key Lime Juice: Fresh juice provides the best flavor, but bottled key lime juice works in a pinch.
- Chill Thoroughly: The bars set better when refrigerated for several hours.
- Use a Hot Knife: For clean slices, warm your knife under hot water and wipe it dry between cuts.
FAQs
1. Can I Use Regular Limes Instead of Key Limes?
Yes! Regular limes (Persian limes) can be used if key limes aren’t available. The flavor will be slightly less tangy but still delicious.
2. How Do I Store Key Lime Pie Bars?
Store them in an airtight container in the fridge for up to 5 days. You can also freeze them for up to 2 months.
3. Can I Make These Bars in Advance?
Absolutely! These bars actually taste better when made a day ahead, as the flavors develop while chilling.
4. What’s the Difference Between Key Limes and Regular Limes?
Key limes are smaller, have more seeds, and have a more intense, aromatic flavor compared to regular limes.
5. Can I Use a Different Crust?
Yes! While graham cracker crust is traditional, you can try crushed vanilla wafers, digestive biscuits, or even a shortbread crust for a twist.
Conclusion
Key Lime Pie Bars are the perfect combination of sweet, tart, and creamy flavors in a convenient bar form. Whether you’re a longtime fan of key lime pie or trying it for the first time, this easy recipe will have you coming back for more. Give it a try and enjoy a refreshing citrusy dessert that’s perfect for any occasion!
Let me know if you’d like any modifications! 😊